Saturday, December 24, 2011

Let's Bake

It's cookie day and we are ready to bake! On the plans for today are:

  1. Grandma Henkel's Holly Cookies
  2. Sugar Cookies- for Santa!
  3. Candy Bar Sugar Cookies
  4. Peanut Butter Blossoms
And we'll see what else we add to the list!!

Cookie baking is always fun and since we didn't do any at home I'm super excited that we get to do it together as a family!!
First up, Sugar Cookies:


Next Grandma Henkel's Holly Cookies (My Fav!)

 Baking is so much fun!!
Of course sampling when you're done isn't bad either!!
 
signature

Friday, December 23, 2011

Oceans of fun!

Okay really it was the Gulf...yesterday we traveled a little southwest to stop and see my dad at his place. It was fun, since we didn't tell the kids where we were going just that Jill was leading us on an adventure. Jake knocked on the door and was a little shocked to see Grandpa...it was funny, he even jumped back!!
 
After visiting awhile we headed to lunch at one our favorite spots, Sweet Tomatoes. We sooooo need to get one of these in Michigan. It's so YUMMY!
 
Then we headed to Clearwater Beach so the kids could see the Gulf. It was fairly warm, but I didn't know how much swimming there would be....not sure why I questioned that. The minute we got suits on and headed for the water they were in!!
 
They had fun jumping the waves, playing in the sand, collecting shells and just splashing!
 
All in all, it was a nice day! Next on the agenda....cookies!!
Click to play this Smilebox photo album
Create your own photo album - Powered by Smilebox
This photo album personalized with Smilebox
signature

Wednesday, December 21, 2011

Family Fun

Well the warm weather is here and we are enjoying every bit of it!
The kids have been swimming everyday since we arrived and there is so much fun yet to be had. Our list of activities is long and we can't wait!
  1. Legoland
  2. Swimming
  3. Disney Quest
  4. Beach
  5. Cookie Baking
  6. Santa Visit
And of course some game time with family! The memories we will make will last a lifetime and we can't wait!!
signature

Friday, December 16, 2011

Memories Made

Pretty much since th day my daughter was born I have been dreaming of taking her to American Girl Place. My mom and I talked for years about what would be the perfect age, what one to get her and when to take the trip....
Well this past Sunday Emmah, Tob and I took that trip.
To start the day Emmah woke up to this:
 

After some smiling and jumping up and down we ate some breakfast and got ready to hit the road. We didn't tell her where we were going, and surprisingly she didn't catch on either.
One funny part was one we got to downtown Chicago, she kept saying, "There's an American Girl Store down here..."
Once we arrived she was more than excited!!
As we walked through the store her eyes were aglow and her smile from ear to ear as she grabbed item after item to purchase...
We did talk her down a bit, but every penny spent was worth it in the memories.
Here is Emmah and her new doll, Rebecca:
As an extra special treat we also enjoyed a late lunch in the cafe...they even serve the dolls
Emmah was impressed with all the different courses they serve, and its so fancy! They even give you conversation questions, which were fun for us to enjoy with each other!
Emmah and her delicious desserts!!
The memories we made will surely last a lifetime...and a day I will never forget and I hope she won't either!
I love you always and forever!


signature

Wednesday, December 14, 2011

Fun Forest

Again my crafting bug has hit and I am in full holiday mode trying to make fun things!!  

I NEEDED...okay WANTED a few more things to add some decor around the house. Especially this year I am low on decor, since we are not home for the holidays I didn't drag out all my decorations. I have been wanting to make some kind of version of these since I have seen them everywhere on pinterest.
To get started gather your supplies.
You'll Need:
  • Styrofoam tree (any size will work)
  • Yarn
  • Pom poms
  • Hot Glue
I started with the yarn tree.
  1. To begin I put some hot glue along the bottom of the shape and slowly wrapped the yarn around. This gives you a solid and straight bottom to work with. Also this ensures that you get all the way down to the bottom and don't see the styrofoam.
  2. Next begin wrapping. I started not overlapping, but then decided I kinda liked the look of the overlapping. Make sure you're watching so you don't have an empty space....I learned this the hard way! Wrap till you have reached the top.
  3. When at the top for the top inch or so I again used the glue. This made sure it stayed in place as well as covered the entire shape.
Now on to the pom pom tree. For some reason with this one I forgot to take pictures! But it goes like this:
  1. Using hot glue run a line around the bottom of the tree...add the pom poms one by one. I used a 1" pom pom. I went in a pattern using the 1" and then adding some fun color in a 1/2"
  2. Continue adding lines of glue all the way up the tree until it is fully covered.
  3. I then glued this tree to a candle stick holder I had...I know I have another one somewhere so when I find it I will put the other one on one too!! I used the hot glue to attach it.
Here is my fun forest...I am thinking I might make a larger one next year to add to the top of my kitchen cabinets.

signature

Tuesday, December 13, 2011

Take Notes

Looking for a fun and simple holiday gift?? Well I found the perfect thing for you. 
 
 
Simple and fun note holders!
Here is what you'll need:

  • Clear Acrylic 4x6 photo holder
  • Scrapbook paper
  • Post-It Notes
  • Fun letters and accessories
  • Hot glue gun w/glue or E-6000

To start cut your paper to fit into the frame. Once you have this done add your Post-It Notes, I removed the back paper and the just stuck the last Post-It to the frame.

When you have that done, you can add fun letters and other details to make it fun. I used some extra letters I had around as well as some buttons, and ribbon. You could use almost anything. Just get out your hot glue gun or E-6000.

Here are final product! I LOVE how they turned out and definitely plan to make more!


signature

Friday, December 9, 2011

JOY

The holidays always suck me into full crafting mode and I find tons of fun and festive ideas that I just HAVE to try...well this year is no different other than Pinterest in NOT helping me, just encouraging me!
I have seen many variations of these yarn letters and just LOVE how they look, so I decided to put a holiday spin on some....
Here is what you'll need:
  • colorful yarn
  • paper mached letters
To start I began by wrapping the top edges of each letter...now I would LOVE to show you pictures, but well I forgot! Once you have the top edges wrapped I began to wrap horizontally around the remainder of the letter until it was fully covered. I'm not going to say this was easy, cause it wasn't...just keep trying an adjusting as you go.
Here are what my complete letters look like:

I am now thinking I might do some for everyday...just trying to decide what word to do, since some letters are more difficult then others!
signature

Thursday, December 8, 2011

Dry Off

Holiday craft craziness has hit again!! I have been looking for awhile for some fun holiday towels, but with very little success. I don't want to pay a fortune for towels, I mean you do use them to wipe your hands and dry dishes..
So the other day while meandering through Target I saw these towels and thought just maybe I could make them into something special. So I grabbed them, when I got home I dug out some holiday ribbon and some extra large ric rac I had around and got to sewing! 


Now I have fun and festive towels!! There were super simple too!! I think it too me about 30 mins if that for both, and that was with being interupted!

signature

Tuesday, December 6, 2011

Chips Adventures

Here are some of the fun adventures our Elf Chip has been on since he arrived: 


Obviously he needed a litlle snack and some time with his friend the Nutcracker!

signature

Monday, December 5, 2011

Tis the Season

Sorry, I have been missing it has been a crazy week and I have been going holiday crafting crazy!!
I of course really do have a Pinterest problem...and of course I found another project I just had to make.
I have been on the look out for something unique to hold all of Christmas cards every year and have just not been happy with what we had so...I got myself a extra black frame I had around and then bought some super cute festive ribbon.
 
To make your own card/photo holder here is what you need:

  • festive ribbon
  • empty frame
  • stapler

  1. The first thing I did was lay my frame down back side up.
  2. Lay your ribbon across the frame, you'll want the ribbon pulled tightly.
  3. Staple the ribbon onto the sides and then you can trim the ends.
  4. The there you have it!!!


And now we have a cheerful and festive holiday card holder ready and waiting for all the holiday cheer!

signature

Sunday, December 4, 2011

12 Days of Christmas

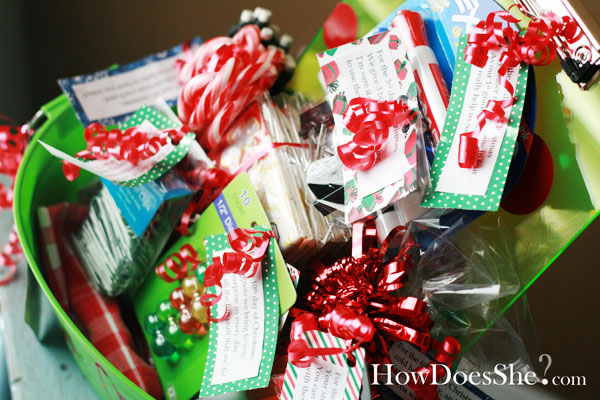
I love to give thoughtful and unique gifts so this year I decided that it would be fun to do something different. I saw on How Does She a fun holiday gift for the teachers using the 12 Days of Christmas.
So since I am homemade gift queen I knew that I was going to have to get some ideas together and then get started early figuring out what gift when etc.
Well, I made a list of some of my finds and things I knew would come in handy for any teacher and let my daughter chose which ones she wanted to give.
Here is what we came up with:
Day 1: Frame
Day 2: Scrabble Tile necklace w/extra charm
Day 3: Hot Chocolate
Day 4: Post It Notes
Day 5: Kleenex/Hand Sanitizer
Day 6: Binder Clips
Day 7: Pens/Sharpies/Markers
Day 8: Muffins
Day 9: Coffee pods
Day 10: $10 Barnes & Noble card
Day 11: Gum
Day 12: Magnet Board & 12 magnets
 
We had lots of fun coming up with ideas of what to do, but there are many other versions you yourself could do.
Check out How Does She for their version:
 
teacher-supplies-gift
 
Or this version by Crafting mom, which is for teacher appreciation, but can easily be adapted!!


I love the idea of not only getting crafty, spreading out the love, but also giving gifts that are useful.
 
Hope you are enjoying your holiday seasong!
 
signature