Monday, August 29, 2011

School Time


Well it is official, school is coming whether we want it to or not. And my wreath obsession is just continuing! Since it is almost the start of a new year I decided that I was in need of a new fall wreath, something that went with back to school!
Well if you're crafty then you know where to head for some inspiration...Pinterest!
 
I found a lot of options, but decided a crayon wreath was the way to go. So here is how I got started:
 
Supplies:

  • wreath form
  • fabric strips
  • hot glue gun and glue
  • crayons, I used 3 boxes for a 10"
  • ribbon

1.  To begin wrap your wreath with the fabric strips. I used some red gingim and used 4 strips about 1 1/2" wide.


2.  Next I set up my crayons in the order I wanted them glued on. Just to make sure I had the right amount as well as a good mix of the colors. I took out the black, brown, and white just because I wanted it to stay colorful.
 
3.  Next I glued the crayons to my wreath form.
 
4.  Finally I added ribbon to the top to hang it by and then put it on door. I couldn't be happier with how it turned out!
 
signature

Saturday, August 27, 2011

Lunchtime!


Well I am a sucker for cute and lunchtime is no different! It's kinda an obsession!!
Last year a collegue of mine gave me this boring silver lunchbox that we had gotten for teacher appreciation week. I knew I had to do something fun with it. Originally I was going to make it for my son, but we recently ordered these super fun sandwich cutters from Williams and Sonoma which came in an AWESOME tin lunchbox, so that will now become Jake's new lunchbox. Well of course that meant Emmah needed something special....cue brilliant plan to revamp lame silver tin lunchbox!!
 
Here is what it looked like to start with:
Then I used some ModPodge to add some scrapbook paper to the front and back.
 
Once it dried I added a top coat and some extra details on the front!
 
Now it was time for some real fun! With my new obsession of Pinterest...I found this GREAT idea to put chalkboard paint on the inside cover. One look and I was all over it! How fun is this??
 
I am so excited to put love messages, words of encouragement, and jokes on it for her!!
signature

Thursday, August 25, 2011

Hopeful


The school year is fastly approaching and we are hopeful that all we have been working on over the past months is going to really make a difference when school starts. She is a very different girl today then she was when she ended school last year. I am hoping that when school starts she looks at it as a fresh start.
 
With that being said there are still things I worry about, she is still chosing to use wrong words, and learning to not make quick judgements or respond without thinking. Learning to take that extra moment to think before she acts will be very important.
 
We are looking into some regular counsuling for her, in addition to what she will recieve at school through the social worker. I feel it is important for her to be able to talk about what she is feeling about things as well as the rest of us. We've had a difficult last few years and I think we all could use a chance to sit back and chat about it.
 
Things with school continue to challenge us and we meet those challenges with our eyes focused on the prize, Emmah being successful and being in a quality learning environment. Although things don't always go our way, which right now they aren't we will remain calm (okay, one us will be calm and the other will freak out. Then the calm one will then try to calm down the other one!)
 
I think I'm going to have to keep this quote in mind:
 
Sometimes not being in control is the most beautiful thing in the world.
signature

Tuesday, August 23, 2011

A new loss


We have hit a MAJOR milestone here at our house! Jake lost his very first tooth this weekend! When there was the first wiggle he was so excited and could hardly wait for it to fall out. But as it got looser he got nervous that it would hurt when it came out.
 
Well finally on Saturday, it came out with a little extra wiggle from Dad!

His new smile!!

Look what the tooth fairy brought me!!
signature

Sunday, August 21, 2011

Delicious


Since picking blueberries I have been looking for different recipes to try. I started with the normal muffins, to which my kids weren't really impressed! Oh well! I then was given the suggestion by my husband of trying to make this delicious blueberry recipe from Grandma.
So I gave it a whirl...and SUCCESS!!
Emmah helped me make these and helped eat them too!


Blueberry Delight
1 1/2 cups flour
1/2 tsp salt
1/4 tsp baking soda
2 eggs
3/4 cup butter
1 cup butter
2 cups blueberries
5 1/2 oz butterscotch chips
1/2 cup pecans (optional)
2 Tbsp brown sugar
 
Makes 2 round or 1 9x13
Preheat oven to 350.
Cream butter and sugar, then beat in eggs. Add flour, salt, baking soda and mix in. Fold in blueberries. Lightly spray pan with non-stick cooking spray and add batter. Sprinkly top with butterscotch chips, pecans, and brown sugar. Bake for 40-45 mins, check at 35 mins.
I hope you'll give this one a try!
signature

Tuesday, August 16, 2011

Down & Up


I have completely fallen off my diet track and completely slacked for the last couple of months. I guess this is what happens in the summer, but I really need to get focused!! I have a few plans when school starts again, but for now a friend of mine and I have started a new little plan to keep up accountable!!
 
The new rule is that you can't eat after 7:00pm and NOTHING sweet!!
Okay the sweet thing is killing me, I am a total candyaholic!
 
So far I am doing well, but it is only week one! I am down 1lb and earned $3, since she ate after 7:00 three times! I feel a little bad for taking her money, but proud of myself at the same time!
signature

Monday, August 15, 2011

Baby Bonanza


Currently we have 2 friends that are expecting babies. One is expecting their second, hopefully a girl, and the other their fouth...SURPRISE!!
Even though they have supplies and this isn't their first our group of friends decided we should have a baby shower for them anyway. Nothing super fancy just a reason to get together and celebrate some great friends and their new additions.
 
  1. I decided since I had recently mastered the ruffle that this meant I should really try to make ruffle bottom onesies...I've been dying to make these! I started off with the onesies and choosing my fabric/ribbon.                                                 
  2. I sewed down the middle of the fabric/ribbon with the loosiest stich on my machine.
  3. Next I pulled the top thread to make the ruffle. I pulled it pretty tight, and then loosened it to make it fit the length of the onesie.
  4. Next pin the ruffle onto the onesie where you would like the ruffle. I hadn't pinned in my previous trys, but with this you really want it to be perfectly straight.                                
  5. Once pinned I I sewed down the middle of the ruffle. Then continue on with the rest of your ruffles, mine are less than an inch apart to create a close ruffle. (As you can see with the fabric ruffles they are slightly wider so I only put 2, 3 just looked too crowded.
  6. All done and ready to enjoy!

Here are my completed baby gifts. Each mom also recieved a coordinating long-sleeve onesie, crocheted hat, and then personalized blocks. (I make the blocks as well, they are my home-based business)
 

                                                         signature

Sunday, August 14, 2011

Back to School


I am seriously into some awesome back to school shopping not only for my kids, but for me for once! There are just a few things I am just loving!!
 
Untitled

The purple is great and the outfit is simple!!
 
Here is another great combo I really need to get:
 
Teal Love

 
 What are you wearing this fall??
 
signature

Friday, August 12, 2011

Bookworm


Okay confession time...Hi, my name is Kate I teach reading and DISLIKE reading for pleasure.
 
Wow, don't I feel better!! It has been years since I have picked up a book and read it just to read and enjoy. Well with the encouragement of some girls who wanted to start a book club, I decided it was about time I give it a try and really allow myself to read, discuss, and enjoy. The book..."The Help".
 
 
Now at first I wasn't sure how I would feel about this book, I had seen the movie preview and thought it looked like a great movie, but could I read the book?? Well, once I picked it up, I could hardly put it down!! It was really helpful that we had 2 weeks of swimming lessons to allow some reading time, but overall I really LOVED this book!! The style it was written, the time period, all of it.
I won't give too much away about the book, but the characters in this story seemed so real to me and I could totally picture all of them. It brings you right in, with just enough background, setting and time period details that you feel like you are living it.
I can't wait to see what the others thought about it when we meet next month...yes I have to wait a whole month to share. I still can't believe I finished a month ahead!!
 
I totally recommend this book, and am not working to get some girls together to catch the movie!!
The next question is...What book do I read next??? If you have a suggestion I would LOVE to hear it!
signature

Thursday, August 11, 2011

Pure Michigan


I sometimes think that maybe we take advantage of the fact that we live in this WONDERFUL state! We live only miles from a glorious lake, enjoy beautiful fall color changes, and have so many great opportunities right in our own backyard.
 
Today we took advantage of one of those opportunities. The kids and I went blueberry picking. I remeber going with my dad in the summers to the blueberry warehouse where he worked, I would sit and eat all the bruised ones they couldn't pack and ship. It was GREAT!!
 
This was our first doing blueberries, although we have done strawberries before.
 
Here is some our loot and we can't wait to make some YuMmY blueberry muffins!
 
signature

Monday, August 8, 2011

Tank Time

I am of course totally addicted to sewing and just can't seem to get enough...so when I finished this skirt:


So I got out a tank top that I had on hand and got started. I have seen tanks like this before so I knew the look I wanted.
  1. I began by making a pattern.
2.  I then used this to cut out my fabric. I cut the main piece out and then used a smaller strip to go down the middle. I used a pattern for this as well. Once cut I used some Steam-a-Seam and ironed it on the back of both pieces. I LOVE this stuff!!

3. I then ironed them onto each other and then the shirts.
4. Next, I went ahead and stitched around the outside of both shapes. I started with the big one and then just had to quickly stitch down the sides of the smaller one.

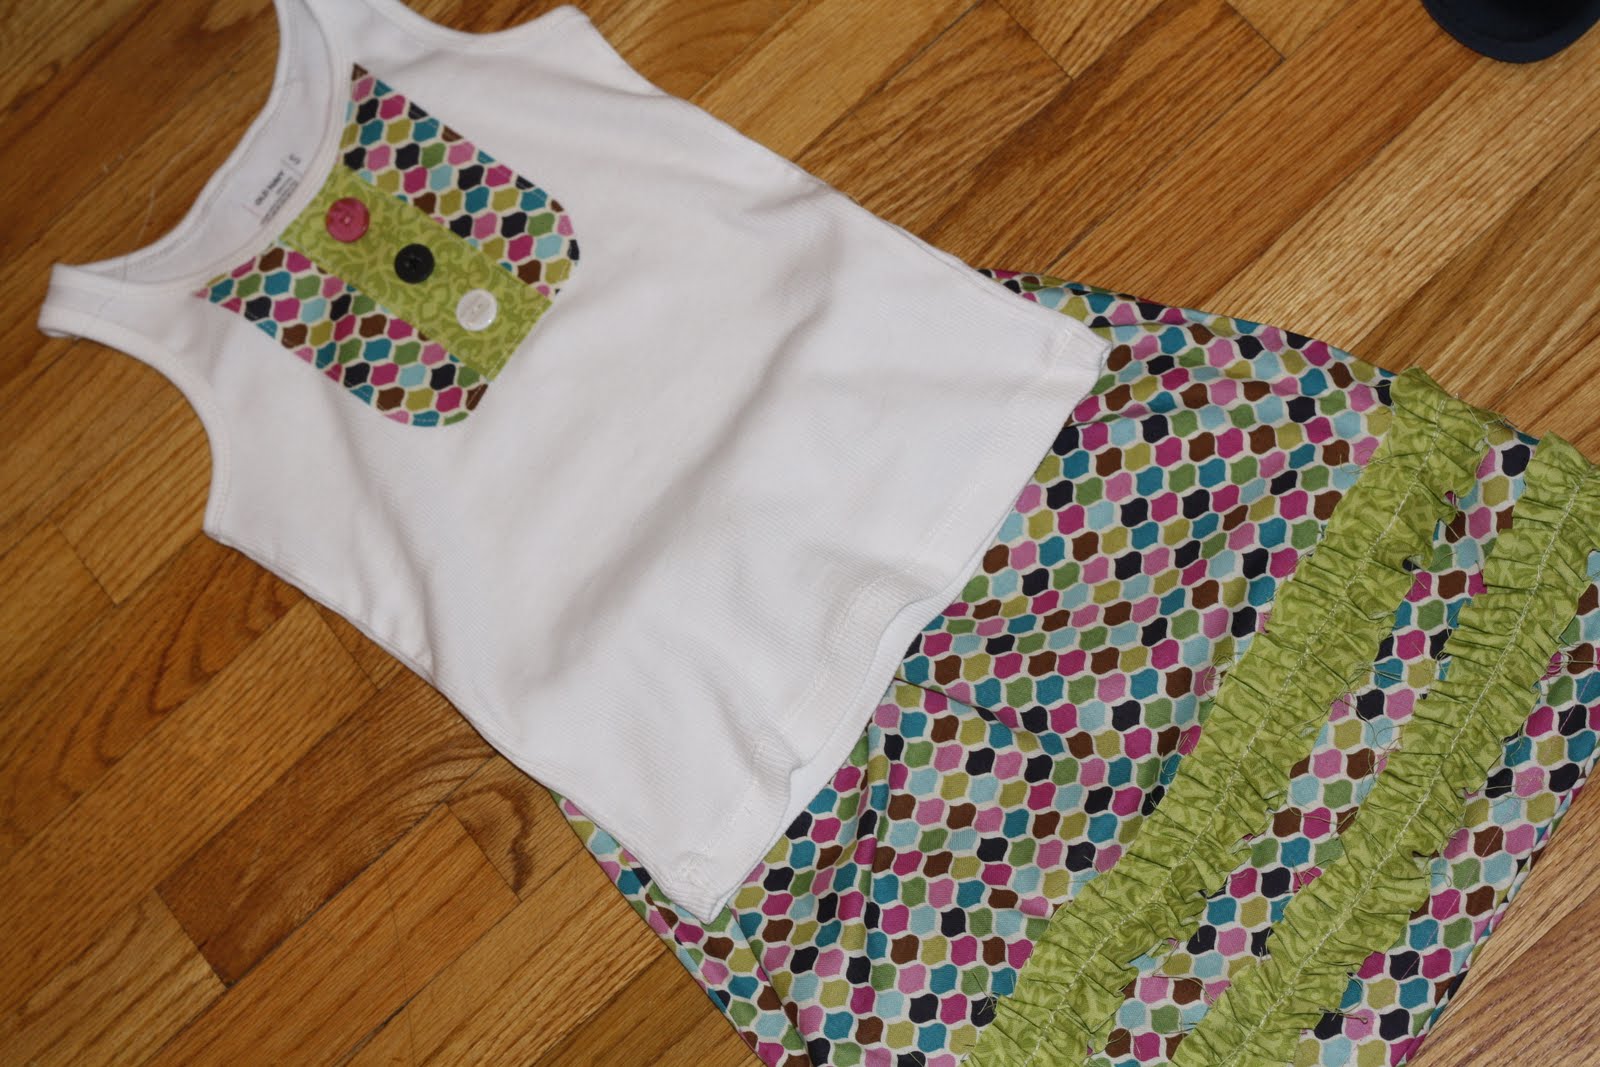
5. For a little extra detail I added some fun buttons I had on hand. I love the extra character it gives the shirt!

And now she has a brand new back to school outfit!! I can't wait for her to wear it, of course she can't either!! I hope you all will try this and if you do I would LOVE to see how they turn out!

signature

Sunday, August 7, 2011

New Outfit

Lately I have been on what I would say is a break from crafting...just too much summer fun to be had!! Well this past weekend, with my son sick and us unable to head out anywhere I decided to try a new sewing project!
I found this great tutorial over at Less-Than-Perfect Life of Bliss! I love an easy yet wonderfully cute project and this was the perfect one.
I started out by measuring Em's waist and deciding how long I wanted the skirt to be.
Her waist was 24" and I went with a length of about 17".
 
First I cut my fabric the width should be your waist measurement time 1.5, so 24x1.5=36". For the length take your desired length and add about 3", 1.5" . I then sewed up the sides ironing the seams flat. I then went ahead and did the bottom hem as well.


Next I started my ruffles, the contrasting fabric should be about twice the width. Then using you loosest stitch on your machine stitch down the middle of the strip. Once done, pull the top thread creating a ruffle. You can adjust this to your desired look.
 
Next, pin the ruffles onto your skirt. Then carefully stitch down the middle of the ruffle.Once this is done you can add your elastic to the top. The length of the elastic should be 2-3 inches less then your waist measurment.


Once you have this you're done!! (Of course if you're me you quickly decide that you should make a matching shirt!) So I did! Here is the whole outfit. I will be add a tutorial on the shirt as well!
 
signature