Showing posts with label tutorial. Show all posts

Wednesday, October 24, 2012

Chevron Fun

We are on the move and planning to finish up the basement, meaning the playroom and my craft room! YEAH!!!
 
With a number of projects on my list I have started to work on some of the small ones bit by bit.
One that I have been wanting to do is chevron initials for the playroom.
I have a current color scheme going of yellow, red, turquoise, and lime green. So I got my supplies and got started!!
 
Supplies:
craft paint
canvas (I used 11x14)
wooden letters
painters tape
foam brush
pencil
ruler
 
To start I measured off 3 horizonal lines each 3.5" apart. That was where the bottom of my chevron hit, this kept them evenly spaced and pretty staright.
I then taped my chevron...this wasn't easy, but wasn't too bad once I got going. Once I got the first row of chevron, I then drew a vertical line from the tip of each down point (sorry, you can't see the pencil lines) this helped me to make sure that all my zig zags were even.


Once I had it completely taped I then painted using my craft paint. I didn't completely cover the tape, and also made sure to keep the paint off the sides of the canvas...I plan to go back and paint this one of the other accent colors.

While my canvas was drying I took that time to paint my letters. For the letters I used another bold color to make them stand out. When all the paint was dry I pulled the tape off and then hot glued the letter right in the middle.
 
Here is what the finished product looks like:
 
And I can't wait to hang this up!! This one is of course Jake's, Emmah's is turquoise and green...they are going to look great!!
signature

Monday, October 22, 2012

Month to Month

I LOVE making crafty gift for others...its fun, personal, and gets my need to be craft out!!
 
Well with babies galore coming in every direction right now I have been on hunt for some good ideas. I am sure you have seen all the adorable monthly onesies out there. Here are a few examples:
 
{photo credit: boogaboohandmade.blogspot.com}
 
DIY Monthly Onesies
{photo credit: brittanyleighpotter.blogspot.com, and be sure to stop by her site since she even gives you the files to print your own (both boy & girl colors!!)}
 
Since I have a Silhouette I decided to create my own since the mom-to-be isn't sure if her bundle is a boy or girl!!
 
To start I went out and got onesies in a variety of sizes. The sizes I purchased were 3 month, 6 month, and 12 month. I figured that even if they were a little big it would be okay.
 
Supplies:
Onsies (variety of sizes)
Inkjet Transfer Paper
Iron
 
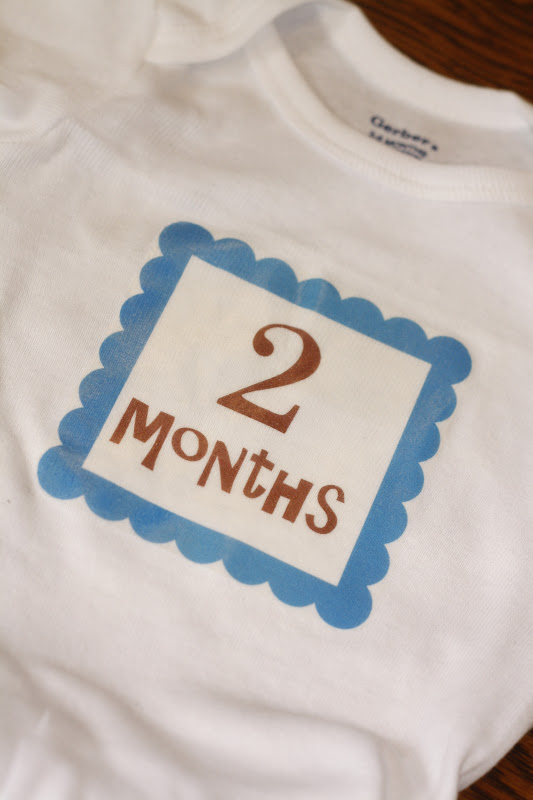
To start I used my Silhouette to make a basic design for my onsies. I went with a frame and then added the month on the inside. Once you have your design down (you'll want to keep them at a size you can fit 4 per page, print them out on your Inkjet Transfer paper. **For colors you could totally customize for a boy or girl or go neutral like I did.
 
Then cut them out, keeping only a tiny edge around the outside of your design.
 
 
Once all mine were printed and cut I ironed them on the onesie.
(Follow the instructions from Transfer paper package as times may vary)

 
Here is a completed onesie:

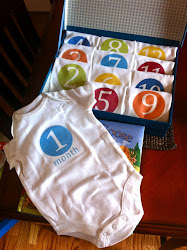
Here is my collection, I rolled them and put them together in a box.


I added a fun little note to go with them for the mom-to-be!!

 
 This is one of my new favorite gifts...now if more people I know would just have babies!!
 
signature

Saturday, October 20, 2012

Initial

I LOVE to put a festive holiday wreath on my door, but sometimes there isn't a holiday that is really celebrated and you have those in between months.
 
So problem solved:
 
Here's the how to on how to make your very own Door Initial!
 
Supplies:
 
Wooden Initial (mine is 10", but you could go bigger or smaller)
Craft Paint
Foam Brush
Ribbon or Trim (for decor, I used ric rac)
Accessories (flowers or buttons)

 
1. To start paint your letter using the craft paint in the color of your choice. I went BOLD since my door is black and I wanted it to stick out!
 
2. Once the paint is dry begin to layout your accessories. I started with my ric rac.
Depending on your letter you may want to omit this, and just use a flower or some buttons just add a little fun to your inital.
 
 
Here it is ready to go:
 
 {Sorry, not my best pic!}

signature

Thursday, August 23, 2012

Study Time

Since moving into this house I have had some fun ideas that I have been just waiting to put into place in the basement. I actually had a friend come over, who by the way is a great decorator, to help with what to do with the basement. And just when we thought we might get things started, we got water....
 
Well now that things have all dried up, it only took 3 years! We have done the work, with that I needed to have an area to put the computer, and even a work area for the kids to draw, color, or even do homework.
 
With the suggestion of using a door, I knew it would be perfect!
Here's how I did it:
  1. To start I went to the local Habitat for Humanity Restore and purchased a door. I chose a smooth interior door, that measured 24" across. I wanted it to be wide enough for work room and for the computer.
     
  2. Next, I took was sanding it, I wanted to make sure the surface wasn't too smooth so the paint wouldn't adhere.
  3. Then, I painted it black. I only painted what I was using for the top, one long edge, and one short edge (only the ones that would be showing) I ended up doing 2 coats to make sure I had a nice even coat of paint. *what you need to paint will depend on what all you need to paint
  4. Once it dried my husband and I attached the table legs that I purchased at Lowes. I painted those black as well. I put both legs on one end, and am using my file cabinet on the other end for the legs.
  5.  
Here is what the final project looks like:
 
{Please excuse all the cords...the hubby is working on that!!}
 
It has truly been perfect!! We have a nice desk to work at as well as keep our items filed and in a proper place. I LOVE how it is working out and will soon be adding a cork/magnet board above it as well.
signature

Friday, August 17, 2012

Ruffles

I LOVE that my daughter has finally taken some interest in her girly side!! It has seemed to grow in the last couple years too!!! (Best part is she is a HUGE sports fan too, so she is a perfect mix!!)

I absolutely LOVE ruffles....on pants, shirts, dresses, skirts, home decor, you name it I think you can put ruffles on it! So of course when I saw this ruffle skirt I just knew I had to give it a try!! Even better that it is made with t-shirt scraps so it is low budget!

Ruffle Mania Skirt

Supplies:
  • tshirts ( I worked with 4 adult and 2 smaller kids sized)
  • thread
  • scissors
  • elastic
1. To begin you will need to make a base for your skirt. I used a sz medium adult tshirt and cut off the arms and sewed the openings closed. Depending on the length you like you may be able to skip that step.
2. Your next step will be to cut strips out of the tshirts. I cut mine about 2" in width, but depending on how wide you want your ruffles you can cut them wider or thinner.


{Here is my collection of tshirts, I mixed colors and patterns}

3. Next you will need to ruffle your tshirt strips. (Here is a link to a tutorial if you are unfamiliar with ruffling, see kate sew)
4.The next step for me was to layout my ruffles...mixing the solid with the print. I also at this point drew lines on my skirt so that my ruffles would be lined and would be evenly spaced and straight on the skirt.
5. I now began sewing my ruffles on one at a time. This took some time and be sure to make them go all the way around the skirt, varying where the each begins that gives you the mixed up look. You can also make your ruffles longer so they go all the way around without mixing on each layer. Be sure to leave about 2-3" to make the waist band.

6. To do my top waist band...I sorta imporvised by cutting a strip to cover the top of my base skirt. I did this since my base shirt actually had a design on it, but if yours is plain you won't need to do this. For the waist band, fold over the top of the of the base skirt and sew, leaving a 2" opening to put in the elastic. I cut the elastic between 2-3" smaller then the waist measurement that way its comfortable.

7. To add the elastic, sew in one spot along the waistband. I chose what would be the side. Next, put a safety pin at the other end of the elastic and move it through the waistband. Once you have it all the way around sew the end to the other end.

8. Wear and enjoy! Here is my final project! I just LOVE how it turned out and so does my daughter, now it's time to make one for me!!

{Please excuse the strings....I forgot to go back and take another pic!!}

signature

Monday, June 18, 2012

Tanked

Summer is FINALLY here and with that comes warmer weather...well usually!! We've had some warm ones here in Michigan, so I'm not complaining at all!!
Since it's been warm and Emmah as in need of some new tank tops I decided it was time to make some fun/fancy ones for her! I picked up a few plain tanks at Old Navy and got to work designing and creating! (Of course you could get them from any where you like, but they had a $2 sale and I jumped right on that!)

Tank 1:

Materials:
*tank
*ruffle trim  1/4 yard (depending on length of rectangle)
*scrapbook paper pattern
*fabric scrap

For this one I wanted to use some ruffle trim I found...and am now in LOVE with. So I first cut a rectangle to go down the middle of the tank.
Next I cut the trim to the same length and made sure the top had a curve to fit the tank. I used some extra scrapbook paper to make a small pattern to make sure it fit nicely along the top edge. I did put a piece of Steam a Seam on just the rectangle, this will help to attach the trim and hold it in place.
Then I used some Steam a Seam to put on the back of it. This will help it to adhere to the tank, even though I am planning to sew it every little bit helps.
Finally we were ready to iron it on!! I followed the directions on the Steam a Seam package. Once it was ironed on, I went ahead and stiched with some black tread around the outside of the rectangle.
This is my final result:


 Tank 2:

Materials:
*tank
*2 coordinating fabrics
*2-3 buttons
*Steam a Seam

For the next tank I decided to go with more of a bib look. I use some old scrapbook paper and cut myself a pattern.
Next I chose my fabric and cut out my shapes. I then ironed them on doing the larger bib shape first and then the rectangle on top.

Once this was done I stiched around the outside of each piece. Bib one first then the rectangular piece. Once that was done I then added a couple buttons right down the middle.
**Sorry I don't have good pics for this one..I don't know what happened!!

Tank 3:
Now for tank three I wanted to be simple but fun! So having wanted to make rolled flowers for the longest time I decided this was it!

 Materials:
*tank
*hot glue gun
*2" fabric strips
*Needle and tread

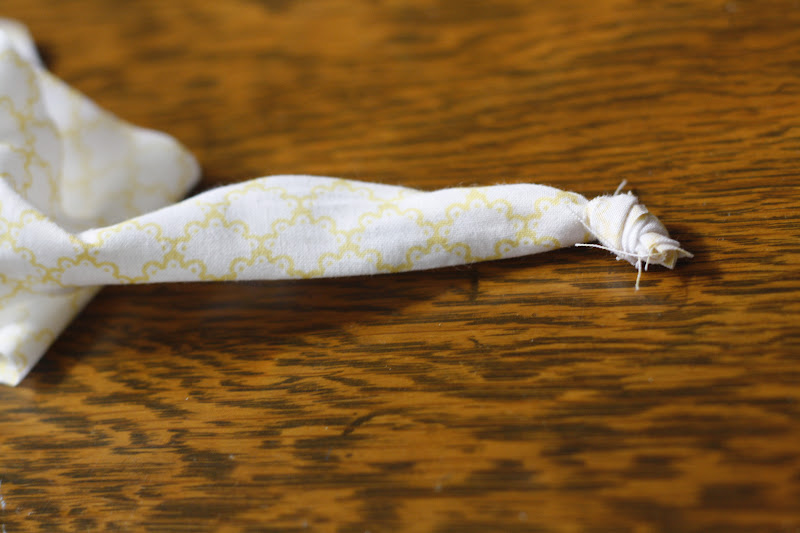
First I cut 2" wide strips of my 3 fabric choices. Depending on the size you want the flowers will depend on how long you cut the strips.Then I tied a know in the end. This knot will become the middle of your flower so you want it as close to the end as possible, and it doesn't have to be super tight.
 Next you begin to roll the fabric and you curl it around the knot. You need to glue as you go with your hot glue, but be careful to keep the glue on the underneath side of the flower. Continue around until you have used all the fabric. I then glued the end to the underneath side of the flower.

Here are what my flowers looked liked when I was finished. These were super easy and quick.

I then went ahead and sewed them onto the tank. I went around the outside edge of each flower going all the way around the outter edge and then did a couple of stiches in the middle to make sure the flowers were completely attached.


Here are what my final tanks look like:


I just LOVE how they turned out and am looking forward to making more as well as making some for myself.
signature

Monday, January 30, 2012

Banded Together

Pinterest Project Alert...
In my goal to try and really organize the house this year I continued on my quest for Emmah's room to have some order. Next on the list hair supplies!! I mean what girl doesn't have a TON of these??
Emmah has recently really gotten into headbands and they are taking over my shelf in the bathroom so I had to do something!
To make a headband holder of your own, here is what you'll need:

I began by cutting my paper to size, you'll need 2 sheets, and you will have extra and can use that for the top.
Lightly Modge Podge the paper around the oatmeal container, being careful not to overdue the Modge Podge. (You will want to trim the 2nd sheet so you have enough for the top)

Once the bottom is done you can trace around the top. I chose to use a different paper and make it about 1-11/2" bigger so it would fit around the lid nicely.

Cut out circle...if you are looking for the edges to wrap around the outside you will need it at least 1" larger than the lid, you can then start by Modge Podging the center on, then start to cut the extra around the outside into strips and gluing them down 1-3 at a time. I used hot glue as my top paper was thicker.
Then VIOLA...

I am loving it...and couldn't be happier with how it turned out!


signature

Wednesday, December 14, 2011

Fun Forest

Again my crafting bug has hit and I am in full holiday mode trying to make fun things!!  

I NEEDED...okay WANTED a few more things to add some decor around the house. Especially this year I am low on decor, since we are not home for the holidays I didn't drag out all my decorations. I have been wanting to make some kind of version of these since I have seen them everywhere on pinterest.
To get started gather your supplies.
You'll Need:
  • Styrofoam tree (any size will work)
  • Yarn
  • Pom poms
  • Hot Glue
I started with the yarn tree.
  1. To begin I put some hot glue along the bottom of the shape and slowly wrapped the yarn around. This gives you a solid and straight bottom to work with. Also this ensures that you get all the way down to the bottom and don't see the styrofoam.
  2. Next begin wrapping. I started not overlapping, but then decided I kinda liked the look of the overlapping. Make sure you're watching so you don't have an empty space....I learned this the hard way! Wrap till you have reached the top.
  3. When at the top for the top inch or so I again used the glue. This made sure it stayed in place as well as covered the entire shape.
Now on to the pom pom tree. For some reason with this one I forgot to take pictures! But it goes like this:
  1. Using hot glue run a line around the bottom of the tree...add the pom poms one by one. I used a 1" pom pom. I went in a pattern using the 1" and then adding some fun color in a 1/2"
  2. Continue adding lines of glue all the way up the tree until it is fully covered.
  3. I then glued this tree to a candle stick holder I had...I know I have another one somewhere so when I find it I will put the other one on one too!! I used the hot glue to attach it.
Here is my fun forest...I am thinking I might make a larger one next year to add to the top of my kitchen cabinets.

signature