And a bunch of ghostly ghouls:
Tuesday, October 30, 2012
Halloween Treats
Monday, October 29, 2012
Time to Make the Doughnuts
Apple Cider Doughnuts
Ingredients:
granulated sugar for preparing pans
2 cups all-purpose flour
1 1/2 teaspoons baking powder
1 1/2 teaspoons baking soda
1/2 teaspoon salt
2 teaspoons ground cinnamon
1 large egg, beaten
2/3 cup packed brown sugar
1/2 cup apple butter
1/3 cup pure maple syrup
1/3 cup apple cider
1/3 cup plain nonfat yogurt
3 Tablespoons vegetable or canola oil (I use unsweetend applesauce, which make them healthier!!)
1. Preheat oven to 400°F. Spray. Sprinkle with sugar, shaking out excess.
2. In a mixing bowl, mix together flour, baking powder, baking soda, salt and cinnamon; set aside. In another bowl, whisk together egg, brown sugar, apple butter, maple syrup, cider, yogurt and oil. Add dry ingredients and stir just until moistened. Don't over mix! Divide batter among the cavities in the prepared pan. Don’t fill them to the top or your doughnuts will lose their holes when the batter puffs up while baking!
3. Bake 10 to 12 minutes, or until the tops spring back when touched lightly. Loosen edges and turn the doughnuts out onto a rack to cool. Clean the pan, re-coat it with oil and sugar. Repeat with remaining batter.
4. Ice your doughnuts, if desired. Sift 1 cup powdered sugar and mix w/ 2 ounces light cream cheese, a dash of cinnamon and enough nonfat milk to create a spreading or dipping consistency. Dip tops of doughnuts into the icing, then set right side up on a rack to let the icing set.
One batch goes a long way...I got about 18 large doughnuts per batch. You'll get LOTS more if you go mini!!
Recipe from Recipe Girl.
Saturday, October 27, 2012
Breakfast Muffins
Ingredients:
egg substitute
sausage (I used turkey sausage)
bacon (again turkey)
cheese
veggies (onions, green peppers, mushrooms)
Next I greased up my muffin tin and we got to work making our muffins. We filled each muffin cup about halfway full of "stuff" (sausage, onions, bacon, cheese etc.)
Once we all had our muffins done...we filled all of them figuring we could each have 1-2 and there would be some left over for a quick breakfast.
Bake in the oven for 25-30mins.
Once done take out and ENJOY! These would be great for a brunch, Christmas morning, or a quick dinner!! Don't forget to serve with hashbrowns and toast!!
Wednesday, October 24, 2012
Chevron Fun
Supplies:
craft paint
canvas (I used 11x14)
wooden letters
painters tape
foam brush
pencil
ruler
To start I measured off 3 horizonal lines each 3.5" apart. That was where the bottom of my chevron hit, this kept them evenly spaced and pretty staright.
I then taped my chevron...this wasn't easy, but wasn't too bad once I got going. Once I got the first row of chevron, I then drew a vertical line from the tip of each down point (sorry, you can't see the pencil lines) this helped me to make sure that all my zig zags were even.
Once I had it completely taped I then painted using my craft paint. I didn't completely cover the tape, and also made sure to keep the paint off the sides of the canvas...I plan to go back and paint this one of the other accent colors.
While my canvas was drying I took that time to paint my letters. For the letters I used another bold color to make them stand out. When all the paint was dry I pulled the tape off and then hot glued the letter right in the middle.
Here is what the finished product looks like:
And I can't wait to hang this up!! This one is of course Jake's, Emmah's is turquoise and green...they are going to look great!!
Monday, October 22, 2012
Month to Month
Supplies:
Onsies (variety of sizes)
Inkjet Transfer Paper
Iron
To start I used my Silhouette to make a basic design for my onsies. I went with a frame and then added the month on the inside. Once you have your design down (you'll want to keep them at a size you can fit 4 per page, print them out on your Inkjet Transfer paper. **For colors you could totally customize for a boy or girl or go neutral like I did.
Then cut them out, keeping only a tiny edge around the outside of your design.
Once all mine were printed and cut I ironed them on the onesie.
(Follow the instructions from Transfer paper package as times may vary)
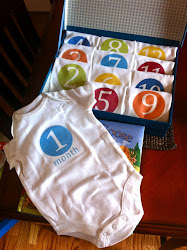
Here is a completed onesie:
Here is my collection, I rolled them and put them together in a box.
I added a fun little note to go with them for the mom-to-be!!
Saturday, October 20, 2012
Initial
Here's the how to on how to make your very own Door Initial!
Supplies:
Wooden Initial (mine is 10", but you could go bigger or smaller)
Craft Paint
Foam Brush
Ribbon or Trim (for decor, I used ric rac)
Accessories (flowers or buttons)
1. To start paint your letter using the craft paint in the color of your choice. I went BOLD since my door is black and I wanted it to stick out!
2. Once the paint is dry begin to layout your accessories. I started with my ric rac.
Depending on your letter you may want to omit this, and just use a flower or some buttons just add a little fun to your inital.
Here it is ready to go:
{Sorry, not my best pic!}
Thursday, October 18, 2012
Bumps in the Road
Subscribe to:
Posts (Atom)