Sunday, December 23, 2012


Stop worrying2
 
Ain't this the truth...
So far it has been a VERY merry Christmas and looking to add a few merry more!!
signature


Thursday, December 13, 2012

New Traditions

Every year is full of change...and change is good.
Well sometimes....
 
This year I am having a really hard time with change. Usually on Christmas Eve we celebrate Christmas with the whole Bloemers side...this year it will be different. Which really is a good thing, since it will be easier for more people to make being the Saturday before. I was hoping we would do our small Bloemers family gathering that night instead, but not he case, which I too understand.
 
This leads me to my issue...we now have NOTHING on Christmas Eve, or really Christmas Day. Usually both night and day are filled with family and they will, but just the 4 of us.
 
This I am dreading...
 
Toby says we will come up with something special to call our own, but it really just makes me miss my mom all that much more...
 
We have some ideas...but I am slowly working myself up. I wish I could just push it back and think of all the special memories we will be making with our kids, but sometime less isn't more and in this case less people, especially one that will be missing is being missed an extra lot this year.
signature

Tuesday, December 11, 2012

Holiday Rush

I don't know about any of you but the holiday hustle and bustle is in full swing at our house.
We have already attended one Christmas party, we have another one this coming weekend and then 2 the following weekend.
 
In between there we are working hard to finish the playroom, craft room, have carpet installed, finish up our shopping, and for me...making gifts!!
 
I love to give people small tokens to let them know just how special they are to me, especially at this time of year! I also really enjoying adding some fun new crafts that have been on my "to do" list to my "done" list!!
 
Currently on my to make list is:
*Initial cup
*People blocks
*Matching shirts (for my neices!)
*Cookies
*Ornaments with the kids
*Holiday tags
*Hot Chocolate mix/chocolate dipped spoons
*Popcorn Seasoning Kit
*Holiday shirt for kids
 
I think that is it for right now...but I'm sure I will think of many more things that I should make!!
 
And I finally got around to ordering my holiday cards, so at least that part of things is done! YEAH!
signature

Sunday, December 9, 2012

Sneaky Elf

With Christmas comes one of my favorite Holiday traditions...Chip our Elf!!
He usually shows up sometime after Thanksgiving and then gets into all sorts of different adventures.
 
**If you haven't heard of Elf on a Shelf...you need to check it out, it really is A LOT of fun and the kids just LOVE it!!
 
 Here is his arrival....I think he arrived in style!
 
Day 2:

 
Day 3:
 
 
 Day 6:

 
Day 7:
The kids are really loving all the adventures "Chip" is having this year!! I am too!!
 
signature

Saturday, November 24, 2012

Thankful Memories

Thanksgiving is always a great time to gather with family. I have some seriously great Thanksgiving memories. Although I have a few that aren't so great, most of my memories just leave a HUGE smile on my face!
 
First of all for years we used to drive to Wisconson to spend Thanksgiving with my uncle and cousins. My mom and I would load our stuff and ourselves into the car and drive the 8 hour drive to my uncles only to stay up even later prepping for the Thanksgiving meal! (I can't remember how many times I stayed up breaking bread for the stuffing!) My mom and my uncle would do some of the other prepping, there was wine, Mountain Dew, and many laughs!
Their favorite thing to make was the stuffing and they really had a knack for it!! Countless wooden spoons were broken...because you don't have the right consistency if you don't break a wooden spoon!! And A LOT and by a lot I mean A LOT of sage was used!! Everyone knows that if you don't need a drink after eating a bite...you NEED more SAGE!!
 
Its these types of memories that make the not so happy ones...fade to the backgroud.
(My mom's last Thanksgiving was spent in the hospital...I brought her dinner, but who wants to eat a Thanksgiving meal there??)
 
I hope my kids have wonderful memories of spending time with cousins, playing/watching football, eating A LOT of food, and most of all of breaking a few wooden spoons and add just the right amount of SAGE!!
 
I hope all of you had a wonderful Thanksgiving, I know I did!!
signature

Tuesday, November 20, 2012

Pot Roast

We are back at trying to really keep to a budget...so that means I actually have to cook...
 
I'll just let that sink in...


Me cooking...regularly!! No it's not a cruel joke either!
 
With that of course comes me being better with time management, and hunting on Pinterest!!
Well, that also meant that I was going to start using some of the beef we had in our freezer and one thing we had a lot of was roasts...that's when I came to the conclusion that I didn't know how to cook a roast...
 
Now normally you wouldn't think this was much of a big deal, you would probably call your mom or grandma and say "Hey how do I make a pot roast??"
I can't do that...
It hit me like a TON of bricks and I just started to cry...at first Toby was unsure what to make of it, but once I explained he understood. Sometimes we take these little things for granted. I have learned to embrace these moments.
 
Teaching my kids how to bake and sew has now moved to the top of my list...I want my kids to share in the memories I have with my mom teaching me. Of course one thing they won't be learning...
How to cook a Pot Roast!!
signature

Monday, November 12, 2012

*Thankful*

These days all too often we don't thank those around us...for just being themselves!
 
So this month I am taking the time to be thankful!
Everyday this month I have shared what I am thankful for here is my list thus far:
  1. My Husband-he is my rock, and can always make me laugh when I need to or give me a good bear hug to let me know it will be alright!
  2. My kids-they may drive me crazy, but my life wouldn't be as rich if I didn't have them!
  3. Crafty-skills (It's such a great release for me!!)
  4. Friends at work-they have been there through the good and the bad and it makes going to work all that much better!
  5. Faith-need I say more??
  6. Right to vote-quite a privilage!
  7. Health-we have been blessed in this department
  8. My brothers and sisters-we may have a huge age gap and live miles apart, but they still check in and keep an eye out for their littest sis!!
  9. Kids School-they have such a GREAT place to learn, and for that I FOREVER thankful!!
  10. Friends-new and old, I have such a great family of friends to lean on!!
  11. Veterans-they gave us and help us keep our FREEDOM, nothing more special than that!
  12. My house-blessed to not only have a roof over my head, but to be able to share and make memories with my kids where I made them as a kid!!
What are you thankful for??
signature

Tuesday, October 30, 2012

Halloween Treats

I am one of those people who LOVES to make fun and festive treats for my kids...and I think they enjoy bringing them to school too! (I mean they do ask, so they must like them right???)
 
Now on most occasions I make cake pops, since they are a favorite of my kids and their friends!! Most teachers think they are pretty tasty too!!
But this year I decided to try something new!!
 
I got some melting chocolates, sucker sticks and cookies and got to work!!
 
Here is the end results:
 
An alien invasion cookie style...
 
And a bunch of ghostly ghouls:
 
Enjoy the treats...there may be TRICKS tomorrow!
signature

Monday, October 29, 2012

Time to Make the Doughnuts

I suddenly have a HUGE obsession with baking...I just LOVE to do it!! Sometimes that is a good thing and other times, well let's just say not so good for the diet! However, I have been working hard to find healthy alternatives in my baking!
 
Well, I LOVE doughnuts! Who doesn't??? But...with the diet they are NOT my friend! Searching Pinterest I came across a baked doughnut recipe and just had to give it a try! Now they are a new fall favorite and my kids want me to look for more recipes! (You know it's serious when you go out and buy an actual doughnut pan!!)
 
Apple Cider Doughnuts
 
Ingredients:
granulated sugar for preparing pans
2 cups all-purpose flour
1 1/2 teaspoons baking powder
1 1/2 teaspoons baking soda
1/2 teaspoon salt
2 teaspoons ground cinnamon
1 large egg, beaten
2/3 cup packed brown sugar
1/2 cup apple butter
1/3 cup pure maple syrup
1/3 cup apple cider
1/3 cup plain nonfat yogurt
3 Tablespoons vegetable or canola oil (I use unsweetend applesauce, which make them healthier!!)
 
1. Preheat oven to 400°F. Spray. Sprinkle with sugar, shaking out excess.

2. In a mixing bowl, mix together flour, baking powder, baking soda, salt and cinnamon; set aside. In another bowl, whisk together egg, brown sugar, apple butter, maple syrup, cider, yogurt and oil. Add dry ingredients and stir just until moistened. Don't over mix! Divide batter among the cavities in the prepared pan. Don’t fill them to the top or your doughnuts will lose their holes when the batter puffs up while baking!


3. Bake 10 to 12 minutes, or until the tops spring back when touched lightly. Loosen edges and turn the doughnuts out onto a rack to cool. Clean the pan, re-coat it with oil and sugar. Repeat with remaining batter.

4. Ice your doughnuts, if desired. Sift 1 cup powdered sugar and mix w/ 2 ounces light cream cheese, a dash of cinnamon and enough nonfat milk to create a spreading or dipping consistency. Dip tops of doughnuts into the icing, then set right side up on a rack to let the icing set.
 
One batch goes a long way...I got about 18 large doughnuts per batch. You'll get LOTS more if you go mini!!
 
Recipe from Recipe Girl.
signature

Saturday, October 27, 2012

Breakfast Muffins

I don't know about your family, but my family really likes breakfast...my kids would be completely okay with just having cereal for dinner (and I'm not gonna lie, there have been a couple of occasions when that is what they have had!) So when I found the idea to make breakfast muffins I just knew that everyone was going to LOVE them!!
 
Ingredients:
egg substitute
sausage (I used turkey sausage)
bacon (again turkey)
cheese
veggies (onions, green peppers, mushrooms)
 
 
To start I went ahead and cooked up both my bacon and sausage...then it would be ready to be added to the egg. Preheat oven to 375 degrees.
 
Next I greased up my muffin tin and we got to work making our muffins. We filled each muffin cup about halfway full of "stuff" (sausage, onions, bacon, cheese etc.)
 
Once we all had our muffins done...we filled all of them figuring we could each have 1-2 and there would be some left over for a quick breakfast.
 
Bake in the oven for 25-30mins.
 
Once done take out and ENJOY! These would be great for a brunch, Christmas morning, or a quick dinner!! Don't forget to serve with hashbrowns and toast!!

signature

Wednesday, October 24, 2012

Chevron Fun

We are on the move and planning to finish up the basement, meaning the playroom and my craft room! YEAH!!!
 
With a number of projects on my list I have started to work on some of the small ones bit by bit.
One that I have been wanting to do is chevron initials for the playroom.
I have a current color scheme going of yellow, red, turquoise, and lime green. So I got my supplies and got started!!
 
Supplies:
craft paint
canvas (I used 11x14)
wooden letters
painters tape
foam brush
pencil
ruler
 
To start I measured off 3 horizonal lines each 3.5" apart. That was where the bottom of my chevron hit, this kept them evenly spaced and pretty staright.
I then taped my chevron...this wasn't easy, but wasn't too bad once I got going. Once I got the first row of chevron, I then drew a vertical line from the tip of each down point (sorry, you can't see the pencil lines) this helped me to make sure that all my zig zags were even.


Once I had it completely taped I then painted using my craft paint. I didn't completely cover the tape, and also made sure to keep the paint off the sides of the canvas...I plan to go back and paint this one of the other accent colors.

While my canvas was drying I took that time to paint my letters. For the letters I used another bold color to make them stand out. When all the paint was dry I pulled the tape off and then hot glued the letter right in the middle.
 
Here is what the finished product looks like:
 
And I can't wait to hang this up!! This one is of course Jake's, Emmah's is turquoise and green...they are going to look great!!
signature

Monday, October 22, 2012

Month to Month

I LOVE making crafty gift for others...its fun, personal, and gets my need to be craft out!!
 
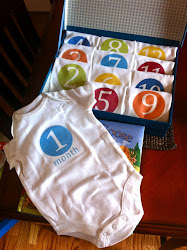
Well with babies galore coming in every direction right now I have been on hunt for some good ideas. I am sure you have seen all the adorable monthly onesies out there. Here are a few examples:
 
{photo credit: boogaboohandmade.blogspot.com}
 
DIY Monthly Onesies
{photo credit: brittanyleighpotter.blogspot.com, and be sure to stop by her site since she even gives you the files to print your own (both boy & girl colors!!)}
 
Since I have a Silhouette I decided to create my own since the mom-to-be isn't sure if her bundle is a boy or girl!!
 
To start I went out and got onesies in a variety of sizes. The sizes I purchased were 3 month, 6 month, and 12 month. I figured that even if they were a little big it would be okay.
 
Supplies:
Onsies (variety of sizes)
Inkjet Transfer Paper
Iron
 
To start I used my Silhouette to make a basic design for my onsies. I went with a frame and then added the month on the inside. Once you have your design down (you'll want to keep them at a size you can fit 4 per page, print them out on your Inkjet Transfer paper. **For colors you could totally customize for a boy or girl or go neutral like I did.
 
Then cut them out, keeping only a tiny edge around the outside of your design.
 
 
Once all mine were printed and cut I ironed them on the onesie.
(Follow the instructions from Transfer paper package as times may vary)

 
Here is a completed onesie:

Here is my collection, I rolled them and put them together in a box.


I added a fun little note to go with them for the mom-to-be!!

 
 This is one of my new favorite gifts...now if more people I know would just have babies!!
 
signature

Saturday, October 20, 2012

Initial

I LOVE to put a festive holiday wreath on my door, but sometimes there isn't a holiday that is really celebrated and you have those in between months.
 
So problem solved:
 
Here's the how to on how to make your very own Door Initial!
 
Supplies:
 
Wooden Initial (mine is 10", but you could go bigger or smaller)
Craft Paint
Foam Brush
Ribbon or Trim (for decor, I used ric rac)
Accessories (flowers or buttons)

 
1. To start paint your letter using the craft paint in the color of your choice. I went BOLD since my door is black and I wanted it to stick out!
 
2. Once the paint is dry begin to layout your accessories. I started with my ric rac.
Depending on your letter you may want to omit this, and just use a flower or some buttons just add a little fun to your inital.
 
 
Here it is ready to go:
 
 {Sorry, not my best pic!}

signature

Thursday, October 18, 2012

Bumps in the Road

Sometimes things just fall into place...like they were perfectly meant to be!!
 
Then there are other days when you hit a bump, and then another...and you just can't seem to get where you need to go! Yesterday was one of those days.
Emmah has been doing great!! Things couldn't be going better, she is LOVING school, her teacher, started GEMS at church, and was really showing some maturity.
 
And now things suddenly have changed....
 
She is still loving school, her teacher, and enjoying GEMS, but her fits are back. And although they seem to be less frequent they are very deliberate and purposeful. The last few fits we have seen have been of epic porportion we are hopeful and looking into some help not only for her, but for us as parents and as a family!
 
We ARE hopeful...there will be answers, it is just going to take time!
 
signature

Thursday, September 27, 2012

A Thousand Words

This picture is worth more...I will cherish it FOREVER!!
 
Daddy tying his "man" tie for picture day.
 
signature

Thursday, August 23, 2012

Study Time

Since moving into this house I have had some fun ideas that I have been just waiting to put into place in the basement. I actually had a friend come over, who by the way is a great decorator, to help with what to do with the basement. And just when we thought we might get things started, we got water....
 
Well now that things have all dried up, it only took 3 years! We have done the work, with that I needed to have an area to put the computer, and even a work area for the kids to draw, color, or even do homework.
 
With the suggestion of using a door, I knew it would be perfect!
Here's how I did it:
  1. To start I went to the local Habitat for Humanity Restore and purchased a door. I chose a smooth interior door, that measured 24" across. I wanted it to be wide enough for work room and for the computer.
     
  2. Next, I took was sanding it, I wanted to make sure the surface wasn't too smooth so the paint wouldn't adhere.
  3. Then, I painted it black. I only painted what I was using for the top, one long edge, and one short edge (only the ones that would be showing) I ended up doing 2 coats to make sure I had a nice even coat of paint. *what you need to paint will depend on what all you need to paint
  4. Once it dried my husband and I attached the table legs that I purchased at Lowes. I painted those black as well. I put both legs on one end, and am using my file cabinet on the other end for the legs.
  5.  
Here is what the final project looks like:
 
{Please excuse all the cords...the hubby is working on that!!}
 
It has truly been perfect!! We have a nice desk to work at as well as keep our items filed and in a proper place. I LOVE how it is working out and will soon be adding a cork/magnet board above it as well.
signature

Wednesday, August 22, 2012

Challenges

I know its been awhile...and I have as of late been using this blog to do more crafts and recipes rather then sharing how our family is dealing with the everyday of a child who is unique in her own way.
 
Some days...things are great! She is happy, cheerful, helpful and hasn't a care in the world.
Then there are the days when things are not so cheerful, there is crying, screaming, and sometimes things get physical.
 
Now while most days are good ones, we seem to hit a bunch in a row that are not so good. One thing we have learned in all this is that timing is everything...if we keep the meds right on track then we are usually okay (not always). Another thing we have learned is once she has gone down the path of no control...there is no heading back, you have to wait out the storm. Sometimes its short...sometimes its long. Most the time its frustrating.
 
I love her unconditionally and wouldn't trade her in for the world. I just sometimes wish I could make it all stop, that my mom was here just as a sounding board, and that I could do more for Em. I know we are doing the best we can and have made some HUGE changes for the good, with doctors and meds. But she will always be on this journey and as a mom and a fixer...I just want to take that away.
 
Pinned Image
 
Another school year is approaching and I know we are going to have a great year, it may have its challenges, but its going to be great!
 
signature